Feeds:
Posts
Comments

fullsizeoutput_1aaf

My husband will eat the whole batch… about 20 wings so I’m pretty sure he means it when he says my buffalo wings are the best ever.  At least they were.  That’s when I was using this super amazing coconut sriracha by Marion Grasby.  It was so good and made the perfect sauce for buffalo wings.  I had initially bought a case of it from Walmart so didn’t think much about it for some time…

Then the unthinkable happened.  The lovely maid Marion stopped distributing it in the US.  I panicked! I had no other options.  Nothing on the market came close so, naturally, I had to copycat the recipe.  After all, how hard can it be to put 7 simple ingredients together and get at least close to her sauce?

Marion’s sauce had sugar, water, vinegar, coconut milk, red chili pepper, salt and garlic.  I experimented about 2 months ago and the results were ok but not enough to call it a copycat.  BUT, when I tried again yesterday….. OH MAN! I nailed it.  So, I’m going to share it with you.  One thing you must keep in mind is I usually don’t measure to the exact cup or spoonful so I’ll do my best to give you the closest measurements I can.

Copycat Coconut Sriracha Sauce

Thank you Marion Grasby!
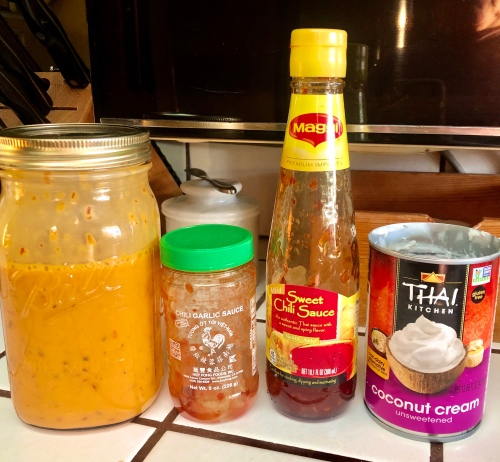
Ingredients:

About 2 cans coconut cream (or 1 can coconut cream + 1 can coconut milk.)

1 cup water

1/4 cup sweet chili sauce

1/2 cup chili garlic sauce

1-2 tsp dried red pepper flakes

salt to taste

Method:

Over medium-high heat a 10″ cast-iron skillet.  Toast the red chili flakes just until they begin to let off their aroma.  Add the water slowly, coconut milk/cream and both the chili sauces and bring to a boil being careful not to cause a reaction in the pan that sends hot yumminess all over your stove and you.  That pan gets HOT!

Now, stir for about 5 minutes while it bubbles and the flavors incorporate.

Voila!

This slideshow requires JavaScript.

The recipe makes enough to fill a 1 quart mason jar plus.

To make the wings

Defrost about 20 wings in a large bowl.  Pour approximately 1 cup sauce and stir the wings around to be sure they have all that yummy, spicy sauce slathered all over them.

Start that fire in the barbecue or smoker and follow the usual directions for such types of fired up goodness.  I get mine at about 250ºF and smoke them with hickory for about 30 minutes turning at least twice.

About halfway through toss the wings back into the bowl and mix them up again to cover with what’s left of the sauce in the bowl.

Place them back on the fire to complete the cooking process.

Serve them with your favorite dipping sauce!  My husband likes ranch dressing.

Makes about 20 wings but I promise you that won’t be enough so may I suggest you double the batch.

Let me know if you tried this recipe by commenting below.   And, as always, thanks for visiting and God bless!

“Who executes justice for the oppressed, Who gives food to the hungry.

The LORD gives freedom to the prisoners.”

Psalms 146:7, NKJV.

YL0nJrIWQ7S5o0ecAf2bpw6bPclSJ4QSureQWq5aORHw

I’ve made it before…. Nothing new here, but…. I had to share this one because it came out so beautifully.  Not only visually but the texture was perfect and the flavor just right.

Using the Master Recipe from Artisan Bread in 5 minutes a day I tweeked it just a tad to include flaxseed meal and increased the water a bit.

I used the No-Knead method which I think is the easiest way to make fabulous bread and I have success every time.  Every loaf comes out great even when I mess with the ingredients and get creative.  So, I do hope you enjoy this one as much as I did.  Cheers!

No-Knead Artisan Bread with flaxseed

In a large bowl or dough bucket combine the dry ingredients.  Mix in the warm water until it everything is wet.  You want the dough to be wet and sticky.  The no-knead process works best when it’s wet.

Cover the container with plastic wrap or a lid but be sure it’s not air tight.  The dough needs to proof from 2 to 5 or more hours on the counter or, if it’s cold, on top of the fridge where it’s a bit warmer.  The wonderful thing about no-knead dough is you don’t have to be on a strict schedule.  In fact, if you leave it a while the yeasties and do their magic and it will have a better texture so don’t panic if you forget you left in on the counter.

Once it’s at least doubled in bulk you can either put it in the fridge until it’s time to bake or you can bake it right away.  I used only half the dough today and will make up the rest after the first loaf is gone.

Now, use lots of flour for dusting the wet dough and take out as much as you want to form a ball, or two.  Or you can make smaller ones for fun.  Place the formed loaf on some parchment paper sprinkled with either flour or cornmeal and allow it to rest for about 40 minutes.

Preheat the oven to 450º.  You have a few options for baking the bread.  You can bake one loaf in a dutch over like me or you can put your loaves right onto a cookie sheet or pizza pan.  Whatever you have available to you works just fine.  However, if you choose to use a dutch over you’ll want to put it in the oven during the preheating so it will get nice and hot and be ready to receive the loaf.

once the dough has had a chance to rest give it a liberal dusting with flour and use a very sharp knife to slash the surface about 1/4 in deep.  The design is up to you. A hashtag or shell design work great to allow the surface to stretch as the dough rises during the baking cycle.

Lift the parchment with the dough right onto your pan or into the dutch oven.  Put the lid on the dutch oven and bake for 30 minutes.  Remove the lid and bake another 10 minutes.  When it’s finished just lift it out of the pan and put it on a rack to cool.  Give it at least 30 minutes before you slice it up for toast or sandwiches and enjoy the wonderful thing that is bread!

Ingredients:

6 cups bread flour (use the scoop and swipe method)

3 cups warm water (a little more if it’s dry.)

3/4 cups flaxseed meal

2 packets active dry yeast

1 tbs coarse sea salt


“For we, though many, are one bread and one body, for we all partake of that one bread.”

1 Corinthians 10:17

This slideshow requires JavaScript.

I did not write the following.  I found it floating around the www with no apparent accreditation.  Please forgive me if this belongs to you.  Send me a message and I’ll be happy to give you credit for it.

“Do you know that If you boil some bay leaves in a glass of water and taste it, it will have no flavor?
Now why do you put bay leaves in the meat?

The addition of bay leaves to meat converts triglycerides to monounsaturated fats, and for experimentation and confirmation:

Cut the chicken in half and cook each half in a pan and place on one bay leaf, and the other without bay leaf and observe the amount of fat in both pans.

If you have bay leaves, there is no need for a pharmacy. Recent scientific studies have shown that bay leaves have many benefits & helps to get rid of many serious health problems and illnesses.

The benefits of bay leaf are: –

*Bay leaf treats digestive disorders and helps eliminate lumps, Heartburn, Acidity & Constipation.

*It helps regulate bowel movement by drinking hot bay tea.

*It lowers blood sugar and bay leaf is also an antioxidant

*It allows the body to produce insulin by eating it or drinking bay tea for a month.

*IT eliminates bad cholesterol and relieves the body of triglycerides.

*It’s very useful in treating colds, flu and severe cough as it is a rich source of vitamin “C”, you can boil the leaves and inhale steam to get rid of phlegm and reduce the severity of cough.

*Bay leaf protects the heart from seizures and strokes as it contains cardiovascular protective compounds.

*It’s rich in acids such as caffeic acid, quercetin, eigonol and bartolinide, substances that prevent the formation of cancer cells in the body.

*It eliminates insomnia and anxiety, if taken before bed, helps you relax and sleep peacefully.

Drinking a cup of boiled bay leaves twice a day breaks kidney stones and cures infections …

Just like garlic and ginger are a must find amongst my collection of spices, Bay leaves are a must see in my collection of spices too(my little spice secrets to good aroma and flavor)”

anniversary shrimp n grits

This week my husband and I had the honor of attending the 60th wedding anniversary of some very dear servants of the Lord.  We had become acquainted with Gayle and Ada years ago when my husband traveled to Japan on a short term trip to minister to some pastors and leaders and Gayle had also been invited.  The two of them have been close ever since so naturally Ada and I have had the pleasure of getting to know one another.

The anniversary party lasted hours and folks dropped in and out during the day.  We couldn’t get there soon enough and we chatted and played catchup over conversations that included an interview Gayle had done in his younger days with Johnny Cash who had confessed boldly Jesus Christ.  Gayle is a wonderful storyteller and the time flew by.

During the evening the hostess had served up some of the most amazing Shrimp and Grits I’d ever tasted and I pleaded with her for the recipe.  She wrote it out and shared it with everyone who had responded to a Facebook invitation for the event.

Now, I was hoping it would have been simple like, “just go to Pinterest and pin this recipe” but that was not the case so saving the recipe with all my others on Pinterest wasn’t going to happen unless it’s posted somewhere on the inherent.  Hence, this post and the recipe below.  If you ever get a chance to try shrimp and grits don’t hesitate … it is truly a culinary delight!

Thank you Gloria for the recipe.  I’m going to reduce to 1/2 and put it on my christmas menu this year.  God bless you for sharing it with me and God bless Gayle and Ada!  Happy Anniversary!

“A few requested the recipe for the shrimp and grits served at the gathering. Here it is!”

Anniversary Shrimp and Slow Cooker Grits – adapted from addapinch.com serves 8-12

  • 1 1/2 cups Quick Grits (not instant)
  • 3 cups chicken stock
  • 3 1/2 cups water
  • 2 teaspoons salt
  • 1 cup half and half
  • 1 cup heavy cream
  • 4 tablespoons butter
  • 2 cups Trader Joe’s cheddar-gruyere cheese, shredded
  • 1 cup Mexican blend shredded cheese
  • 1 tablespoon minced fresh thyme

Spray slow cooker insert with nonstick cooking spray. Combine grits, chicken stock, water and salt in slow cooker. Cook on low setting for a minimum of 5 hours, stirring once half way through cooking time. Stir in cheeses followed by butter, cream, half and half and thyme. Replace lid and change setting to warm. Grits will maintain a loose texture for up to 3 hours on this setting.

Shrimp – based loosely on Bobby Flay’s recipe

  • 6-8 slices sweet and spicy, thick-sliced bacon (Stater Bros butcher case)
  • 36-40 shrimp, peeled and deveined
  • 4-6 tablespoons unsalted butter
  • 1-2 cups chicken stock Creole seasoning (I used Tony Cacheres)
  • Parsley, chopped

Place bacon slices on foil covered baking sheet. Bake at 400 degrees for 11-12 minutes or until crispy but not charred. Move bacon to paper towel and reserve all drippings. Chop bacon in bite-sized pieces and set aside. Combine bacon drippings and an equivalent amount of butter in a medium saucepan. Add 1 1/2 cups chicken stock, bacon and 3/4 teaspoon creole seasoning or according to taste, being careful not to over-salt. Stir over medium heat till warmed. Add all shrimp and stir just until shrimp is opaque – 2 to 3 minutes, adding additional chicken stock if sauce level is inadequate. Do not overcook shrimp. Scoop a serving of grits into a bowl. Ladle 4 to 5 shrimp with bacon and sauce over the grits. Garnish with chopped parsley.

As an Amazon Associate I earn from qualifying purchases.  Thank you!

SaveSave

Homemade Dog Treats

Makin’ dog biscuits is healthy for your pet & fun!  I have doggies that go bonkers for this recipe.

In large bowl combine 1-1/4cup oat flour & 3cup All Purpose Flour.

Add 2 large eggs, 1-1/2cup water & 1 Tbs omega 3 or olive oil.

Add 1/3cup natural peanut butter.

Mix on low using a stand mixer or by hand to fully incorporate and form a dry dough.

Roll out to approximately 1/8″ & cut into desired shapes.

Bake at 350F until hard to the touch.

Cool & store in the refrigerator in airtight container. Beware of mold. Keep extras on hand in the freezer & defrost when needed.

Next time, I’m trying a horse cookie recipe. Stay tuned….

img_0004c2b1c8711a3041970e8320846152290a-1img_1238

Static Website

Hi folks and thanks for stopping in.  I have not added any posts in a very long time and don’t expect to be anytime soon.  I’ll be leaving the site up for those who might drop in, like you did.   I do hope you find something you like.

Cheers!

Cosima

Maybe this recipe will finally become a reality! I have a pile of pumpkins waiting for their destiny.

Fishes and Loaves

So…. I signed up for the pumpkin recipe contest at my church‘s Harvest Night.  I entered it last year and before that too.  Ok, and I even got the blue ribbon a couple of times.  The question is, do I make something new? or Do I make something that got the blue ribbon in past contests?  I lean on the “new” side for now but, alas, I’m finding it difficult to be creative with pumpkin, for whatever reason.

In the past my entries included pumpkin ice cream (a blue ribbon on this one, yum!) and before that it was a chili bake off.  The others are a bit of a blur.  

There are so many great pumpkin recipes like these Pumpkin Swirl Brownies Deb posted at Smitten Kitchen; one of the many food blogs I subscribe to.  I could easily “borrow” one of them but I would really…

View original post 328 more words

20120821-140540.jpg

Too many tomatoes, peaches falling off the tree and “waste not, want want.” – Sounds like a tomato and peach glut to me.

I finally grew a real garden this year after several bad attempts and concluding there’s no way I’ll ever have a great garden.  But this year it did amazingly well until the temperatures went three digits. Then everything started to brown, wilt and slow in production. Still I had enough produce to put a few pints and quarts away for the rest of the year. This is how things looked on the west side of my patio sometime in June. (there’s more on the east side)

20120821-141146.jpg

And again several weeks later.

20120821-141357.jpg

And just to be sure you get the idea. Here’s some of what was harvested.

20120821-141907.jpg

So far the 3 tomato plants yielded about 50 lbs of tomatoes and this time I decided it was time I did some canning. So I got busy and canned 12 quarts of stewed tomatoes.

20120821-142419.jpg

Then I my husband asked me to make tomato jam. It seems he remembers his mother canning tomato jam when he was a boy. Well, I too remember tomato jam only it was the neighbor across the cul-de-sac from our house. (Thank you – Barbara) And I remember being quite shocked at the sweet yumminess in my mouth.

So, tomato jam would be a first for my kitchen but I couldn’t wait to try it out.  Another several pounds of blanched, skinned and deseeded tomatoes later and some hot bubbly, sugary, steamy work over the stove and several pints were canned.

I was bummed it didn’t set but no worries I just open a jar when I need it, pour the contents into a saucepan and reduce at a boil for about 10 minutes and… Voila! Perfect tomato jam that my husband seems to prefer over that fancy French stuff I pick up at the specialty shop. (have a look at the little jar there next to the quart of stewed tomatoes.)

20120821-143416.jpg

This is the way I enjoy my tomato jam … A cup of tea and toast with cream cheese and tomato jam… Mmmmm.. Deliciousness…. Delightful!

20120821-143845.jpg

Then this morning I got to canning 8 pints of peach butter. I’ve made apricot butter and plumb butter before but this year I decided my neighbors peach tree hanging over my back fence with the puny, boring fruits with bitter skin that don’t ripen on the tree and never get bigger than an apricot wouldn’t go to waste another summer. So I got to work and blanched, peeled, deseeded, simmered and boiled those little lovelies until they were worthy of homemade toast.

It was highly satisfying to hear the canning lids pop (ahhh!) one by one as the jars cooled and sealed in all that sweet fruit.

20120821-144804.jpg

For my next effort I hope to be canning tomato salsa from a recipe that my mother-in-law made.  I lost the recipe years ago and after she passed away I figured I’d never be able to reproduce that awesome flavor until the other day when I remembered a friend of mine has had the recipe for years.  I’ll be giving her a call soon. 🙂

In the mean time, I’m quite satisfied with my labors. My efforts to eat cleaner and closer to the vine are paying off.

Growing your own produce ensures cleaner food on your table and knowing its clean just makes you feel healthier.  Next year I hope to blog my gardens progress more systematically. For now, it was good to finally just get a post on the proverbial paper.

Hope your summer is beginning to cool off.  Leave a comment if you like. Let me know about your canning adventures. Tell me if you’ve ever made tomato jam. Maybe we can swap recipes… c’mon… Ask me how to make it.  For now I’ll leave you with this…

Proverbs 31:15-17

She gets up while it is still night;
    she provides food for her family
    and portions for her female servants.
She considers a field and buys it;
    out of her earnings she plants a vineyard.
She sets about her work vigorously;
    her arms are strong for her tasks.

Yes, I suppose I have to confess that it’s been more than a year since my last post here.  Too long for sure.  I’ve been going through a change in the season of my life and let me tell you it aint no spring season… more like fall or winter.  Life seems to whiz by and it’s not waiting for anybody to catch up.

Lots of things have changed in the past year, like I got hooked on Pinterest.  One of my favorite categories is homemade stuff.  Stuff like bio-green household cleaners, alternatives to lotions, shampoos and the like.  Today I decided it was time I shared some of the surprising results with you.  Of course, I realize this has been for the most part a food blog but today I guess that will be a thing of the past.

And for my first trick…. watch me pull a rabbit out of my orange tree… well not exactly a rabbit.  How about a Citrus Enzyme Cleaner?  I didn’t come up with this myself, infact, I found it on Pinterest and figured I’d give it a try since I have an orange tree and don’t like to waste the peelings. (normally they go into my compost pile)

Here’s the link to the original blog post at Homemade Mamas with the recipe and some good information.  I’ll forgo some of their details and assume you’ll visit the original post for that.  What I will do is share the recipe and my findings.

Citrus Enzyme Cleaner

  • 1.  In a large 3 liter soda bottle (or similar plastic container) combine 7 Tbs brown sugar and 2 1/2 cups lemon and orange peels and scraps in pieces small enough to get into the container.
  • 2.  Pour enough water to cover scraps (about 4 cups) into the container.
  • 3.  Put the lid tightly on the container to make it air tight. Shake the container long enough to get the sugar incorporated throughout.

3 Liter Fermenting Bottle- sugar, water, citrus peels.

  • 4.  Now it’s time to ferment.  Write the date on the outside of the container with a sharpie so you can keep track of the progress and remember when you started.  The sugar/fruit mixture will ferment for 3 months to get those enzymes going. As it ferments, CO2 gas will build up in the container. The container will swell, open it to release the pressure, unless you want an explosion, then recap it. You’ll need to release the CO2 daily in the first month and less often after that. After 3 months, the process is complete, and the enzymes are ready for use as a household cleaner.
  • 6. Filter through a cheese cloth and pour into the containers of your choice.  (I recycled some clear bottles with screw caps)

Homemade Citrus Enzyme Cleaner

You can use full strength or dilute as needed.  For light cleaning I went with a 50/50 cleaner/water solution poured into a spray bottle. You can use it around the house, on floors, cabinets, appliances and it doesn’t streak!  You can also pour a couple of tablespoons into laundry to help remove stains.
Let me tell you this stuff is awesome!  The proof came when I used it on that gunky built up grease that collects above your stove.  You know the stuff I’m talking about, don’t you?  Just look and the ugly mean stuff that has built up since last spring.

Gunky built up grease on the plastic vent cover to my microwave over the stove.

 I’m talking gross!  Now watch what happens when I sprayed on a 50/50 solution and let it sit for a few minutes… not long, just maybe 5 minutes at the most.

After a few minutes I wiped off the gunk with ease! I was flabbergasted!!!

Now look at my microwave… it’s so clean that you cant tell if you are looking through the door at my kitchen or if it’s a reflection.  I’ll let you guess which.

My microwave after cleaning with the same 50/50 solution. It's never been so shiny.

So there you have it!  Try this at home but I recomend you test this cleaner on surfaces you aren’t sure about.  I would hate see you remove the paint off your cabinets or messy up your pretty tile or wood floors.  When in doubt go with a diluted solution first then up grade as needed.

Blessings and joy!  And happy cleaning. [kiss]

She girds herself with strength,
And strengthens her arms.  Proverbs 31:17 

2010 in review

The following information was written by wordpress.com for my benefit.  I figured I’d share it with you.  The only thing is, I really have been “off” when it comes to food blogging in 2010.  Hopefully, 2011 will show some improvement.


The stats helper monkeys at WordPress.com mulled over how this blog did in 2010, and here’s a high level summary of its overall blog health:

Healthy blog!

The Blog-Health-o-Meter™ reads This blog is doing awesome!.

Crunchy numbers

Featured image

A Boeing 747-400 passenger jet can hold 416 passengers. This blog was viewed about 2,200 times in 2010. That’s about 5 full 747s.


In 2010, there were 11 new posts, growing the total archive of this blog to 60 posts. There were 56 pictures uploaded, taking up a total of 6mb. That’s about 1 pictures per week.

The busiest day of the year was October 20th with 55 views. The most popular post that day was “Big Game Suppliers”.

Where did they come from?

The top referring sites in 2010 were en.wordpress.com, thepioneerwoman.com, networkedblogs.com, leasehunter.com, and dobetter.wordpress.com.

Some visitors came searching, mostly for venison chorizo, venison chorizo recipe, christmas crepes, homemade stills, and deer chorizo.

Attractions in 2010

These are the posts and pages that got the most views in 2010.

1

“Big Game Suppliers” January 2009
4 comments

2

Venison Chorizo November 2008
2 comments

3

About that no-knead pizza dough….. December 2008
1 comment and 1 Like on WordPress.com,

4

The 12 Hour Pizza or… Chef John’s No-Knead Pizza Dough December 2008
1 comment

5

Babies Eat Everything January 2010


Some of the most popular posts were written before 2010. Your writing has staying power! Consider writing about those topics again.